2D vs 3D PVC Patches: How to Choose the Right Relief for Your Logo
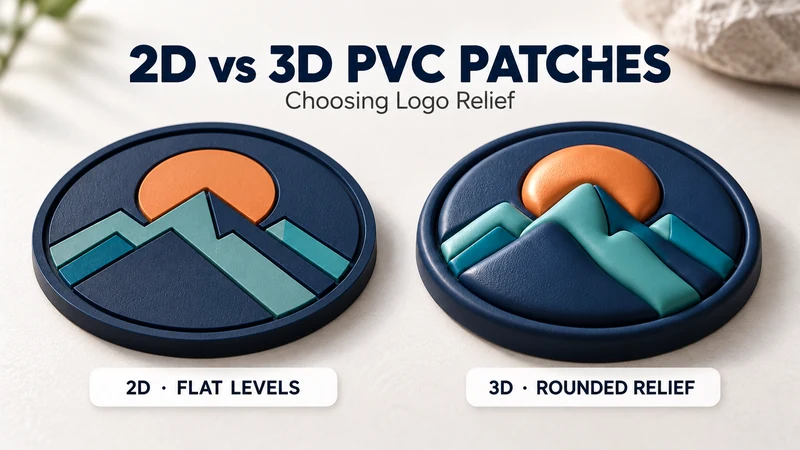
Choose 2D PVC when your logo depends on clear lettering, defined outlines and distinct color areas. Choose 3D PVC when rounded, sculpted features are an important part of the design. A 2D patch can still have raised and recessed levels; the difference is that its visible surfaces are generally flatter and more defined. A 3D patch uses curved contours that give selected elements a more sculptural appearance.
For a buyer, the useful question is not “Which one sounds more premium?” It is “Which parts of this logo need depth, and which parts need to stay easy to read?” Decide that at the patch’s finished size, then review a physical sample from both the front and the side.
What do 2D and 3D PVC patches look like from the front and side?
Imagine the same mountain logo made in two versions.
From the front, the 2D version shows crisp boundaries between the mountain, sun and background. The colored areas may sit at different heights, but their tops appear relatively flat. The 3D version gives the mountain slopes and sun rounded surfaces, so the shape changes more visibly as light moves across it.
From the side, those differences are easier to understand. The 2D design looks like a series of defined steps. The 3D design has more gradual rises and curved profiles. This is why a front-facing digital mockup alone is a weak basis for approving relief: two designs can look similar straight on and feel quite different in your hand.
| Feature | 2D PVC patch | 3D PVC patch |
|---|---|---|
| Typical surface | Flat-topped raised and recessed areas | Rounded or sculpted contours |
| Visual priority | Clear color separation, outlines and lettering | Shape, depth and a prominent focal element |
| Useful logo elements | Words, symbols, flags and graphic shapes | Mascots, faces, emblems and larger organic forms |
| Main artwork check | Are narrow lines and spaces clearly separated? | Will curves remain visible without swallowing smaller details? |
| Sample review | Check the front and the defined edges between levels | Check the front, side profile and transition between raised areas |
Both versions are molded from the approved design. “2D” does not mean a flat printed sticker, and “3D” does not mean every part of the patch must be thick or rounded. See examples of custom 2D PVC patches and custom 3D PVC patches when comparing the two finishes.
Which parts of your logo should be raised, recessed or kept flat?
Begin with the element that people should recognize first. For an outdoor brand, that might be a mountain silhouette. For a team, it might be a mascot. For a uniform supplier, the organization name may matter more than the decorative graphic.
A practical relief plan often gives one large feature the strongest depth and keeps supporting information simpler:
- Main symbol: Consider rounded 3D relief if its shape benefits from visible curves.
- Brand name: Keep the letterforms clearly separated; flatter levels may help them remain legible.
- Background: Use it to create contrast without competing with the main symbol.
- Border: Check that its height and width frame the artwork rather than crowd it.
- Small tagline or date: Review at finished size before assigning any raised treatment.
You can combine approaches within one design. A sculpted mascot with flatter surrounding lettering may work better than giving every letter, whisker and border the same rounded profile. Depth needs a hierarchy. If everything is the hero, nothing is.
How do small text, color blocks and thickness limit the design?
Small text and narrow gaps
A line that looks clear at 400% zoom may close up when the patch is molded at its final size. Round 3D contours can further reduce the visible flat area available for a tiny letter or thin line. If the small text is essential, ask whether it should be enlarged, simplified, moved to a flatter level or removed from the patch.
There is no useful minimum letter size that works for every logo. Typeface, patch dimensions, contrast, stroke width and neighboring shapes all matter. Send the actual artwork and finished measurements for review rather than relying on a generic rule.
Color blocks and gradients
Conventional molded PVC works best when the artwork has defined color areas. Mark where one color ends and another begins. If your logo relies on a photographic image, a soft gradient or very subtle shading, ask whether a simplified molded version will still represent the brand accurately. If those effects cannot be lost, a printed patch may deserve consideration instead.
Provide Pantone references where brand colors matter, then approve the color on a physical sample. A bright screen is useful for discussing a layout; it is a less reliable judge of the finished material.
Thickness and flexibility
More relief changes the patch’s profile and how it sits on a product. A large, heavily sculpted patch may feel different on a structured backpack panel than on a flexible garment. Specify the intended placement and review overall thickness and flexibility on the sample. Do not assume that “3D” automatically means one fixed thickness across every design.
How do the relief structure and mold affect sampling and quotation?
The mold must translate your artwork into workable shapes, color boundaries and height changes. For a 3D design, it also needs to define the curves and transitions that create the sculpted effect. That means a request such as “make it more 3D” is not yet a complete production instruction.
Before sampling, agree on:
- Finished width, height and outer shape.
- The exact artwork version and color references.
- Which elements are flat, raised, recessed or rounded.
- Which text and outlines must remain readable.
- The proposed overall profile and backing.
- Any design details that may need simplification.
A sample allows you to check the results before bulk production. Inspect it in normal light, at normal viewing distance and from an angle. If a feature needs changing, confirm what that means for the mold and quotation before approving a revision. Mold work, patch dimensions, color divisions, complexity, backing, quantity and packing can all affect the final quote; there is no reliable universal percentage by which 3D must cost more than 2D.
For a comparable supplier quotation, send the same finished size and artwork to each supplier and describe the desired relief. Otherwise, you may be comparing two different patch specifications under the same product name. LOVECOLOUR explains its project-based approach on the pricing and MOQ page.
Does 2D or 3D change the backing you need?
The front relief determines the visual effect. The backing determines how the patch attaches to the end product. Decide both before you approve the sample.
| Intended application | Backing to discuss | Detail to confirm |
|---|---|---|
| Removable patch on a uniform or gear panel | Hook-and-loop | Which side goes on the patch and the dimensions of the matching panel |
| Permanent patch on suitable apparel or a bag | Sew-on | Sewing clearance, placement, base material and access to the reverse |
| Another product or display surface | A project-specific attachment option | Surface material, handling conditions and expected permanence |
A molded 3D front does not automatically make a patch removable. Equally, a 2D patch is not automatically intended for sewing. For a removable application, look at hook-and-loop PVC patches and specify the receiving panel as well as the patch.
If the patch is going on a coated bag or a technical fabric, share a photo or swatch of the real material. The best-looking front is little help if the back cannot be attached as intended.
How should you mark the artwork for a factory review?
You do not need to draw a manufacturing-ready mold yourself. A simple marked-up logo can communicate the intended effect much more clearly than the word “3D” in an email.
For example, annotate a mountain logo like this:
| Artwork area | Your instruction to the factory |
|---|---|
| Outer circle | Keep a clean, defined border |
| Mountain peaks | Make these the main raised feature |
| Sun | Use a gentle rounded surface |
| Brand name | Keep letters on a flatter level for readability |
| Small tagline | Check feasibility at the proposed finished size |
| Reverse | Quote hook-and-loop backing; confirm matching panel size |
Add one front-view reference and one side-view reference if you have a particular depth in mind. These can be sketches or photographs of a generic texture, not another brand’s logo. Then ask the factory to show where each level begins and ends in the proof.
If you are unsure whether a feature will mold cleanly, mark it as a question. The artwork review stage is the right time to resolve it—before the mold and sample become your production reference.
What should buyers check on the physical sample?
Review the patch against the intended product, not just against the digital artwork:
- Front view: Is the logo recognizable and is the smallest approved text readable?
- Angled view: Does the intended 3D feature look sculpted? Do any curves hide nearby details?
- Side view: Is the profile appropriate for the cap, bag, garment or uniform panel?
- Color: Are the solid color areas and brand references acceptable?
- Edges: Are the border and narrow outer points clean and consistent?
- Backing: Does the patch attach to the actual receiving product as specified?
- Repeat order reference: Are the approved artwork version, colors, backing and sample recorded?
A photo can help colleagues review the design, but the physical sample is the stronger reference for surface shape, flexibility and color. Keep that approved sample for the bulk-production comparison. See samples and approval for the next stage.
FAQ
Are 2D PVC patches completely flat?
No. They can have raised and recessed areas. The “2D” description generally refers to relatively flat-topped features with defined boundaries, compared with the rounded or sculpted contours of a 3D design.
Is a 3D PVC patch always better for a mascot?
Not always. Rounded facial or body features may benefit from 3D relief, while small names and narrow outlines may read more clearly on flatter levels. Review the complete mascot at its intended patch size.
Can one patch combine 2D and 3D features?
Yes, a design can be planned with flatter lettering and selected sculpted elements, subject to artwork and mold review. Tell the factory which feature should receive the most depth.
Can a small logo be made into a 3D patch?
Possibly, but the available space may limit how clearly its curves and fine details appear. Ask for a review at the actual finished dimensions; increasing the size or simplifying the artwork may improve the result.
Does 3D PVC require a different backing from 2D PVC?
The backing depends primarily on the application. Discuss the base product and whether the patch should be permanent or removable, then confirm which backing is feasible for the approved design.
Will the 3D version cost more?
It may, depending on the mold, relief complexity, size, number of color areas, quantity and other specifications. Request both versions against the same artwork and finished dimensions instead of assuming a fixed price difference.
What should I send to request a quote for both versions?
Send your logo, desired patch dimensions, color references, quantity, application, backing preference and target delivery date. Mark the elements you would like sculpted. Ask for a 2D option and a 3D option so the differences in construction and quotation are explicit.
Need to decide which relief suits your logo? Send LOVECOLOUR your artwork, finished size and intended application. We can review the level structure, discuss the backing and prepare a sample plan before you commit to bulk production.